
Provisioning is the process of creating and managing user accounts, including their properties (e.g., username, email address) and their permissions in Elimity Insights.
Elimity Insights follows two approaches for both provisioning user accounts:
- Manually creating, updating and deleting user accounts using the admin interface of Elimity Insights.
- Automatically creating, updating and deleting user accounts using the SCIM API of Elimity Insights.
Method 1: Manually managing user accounts
The first method for managing user accounts is manually creating, updating and deleting these using the admin interface of Elimity Insights.
Navigation and required permissions
This option is available to users with the permission USERACCOUNT_CREATE_READ_UPDATE_DELETE.
These users will see the item "Elimity accounts" in their main menu ((1) in Image 1).
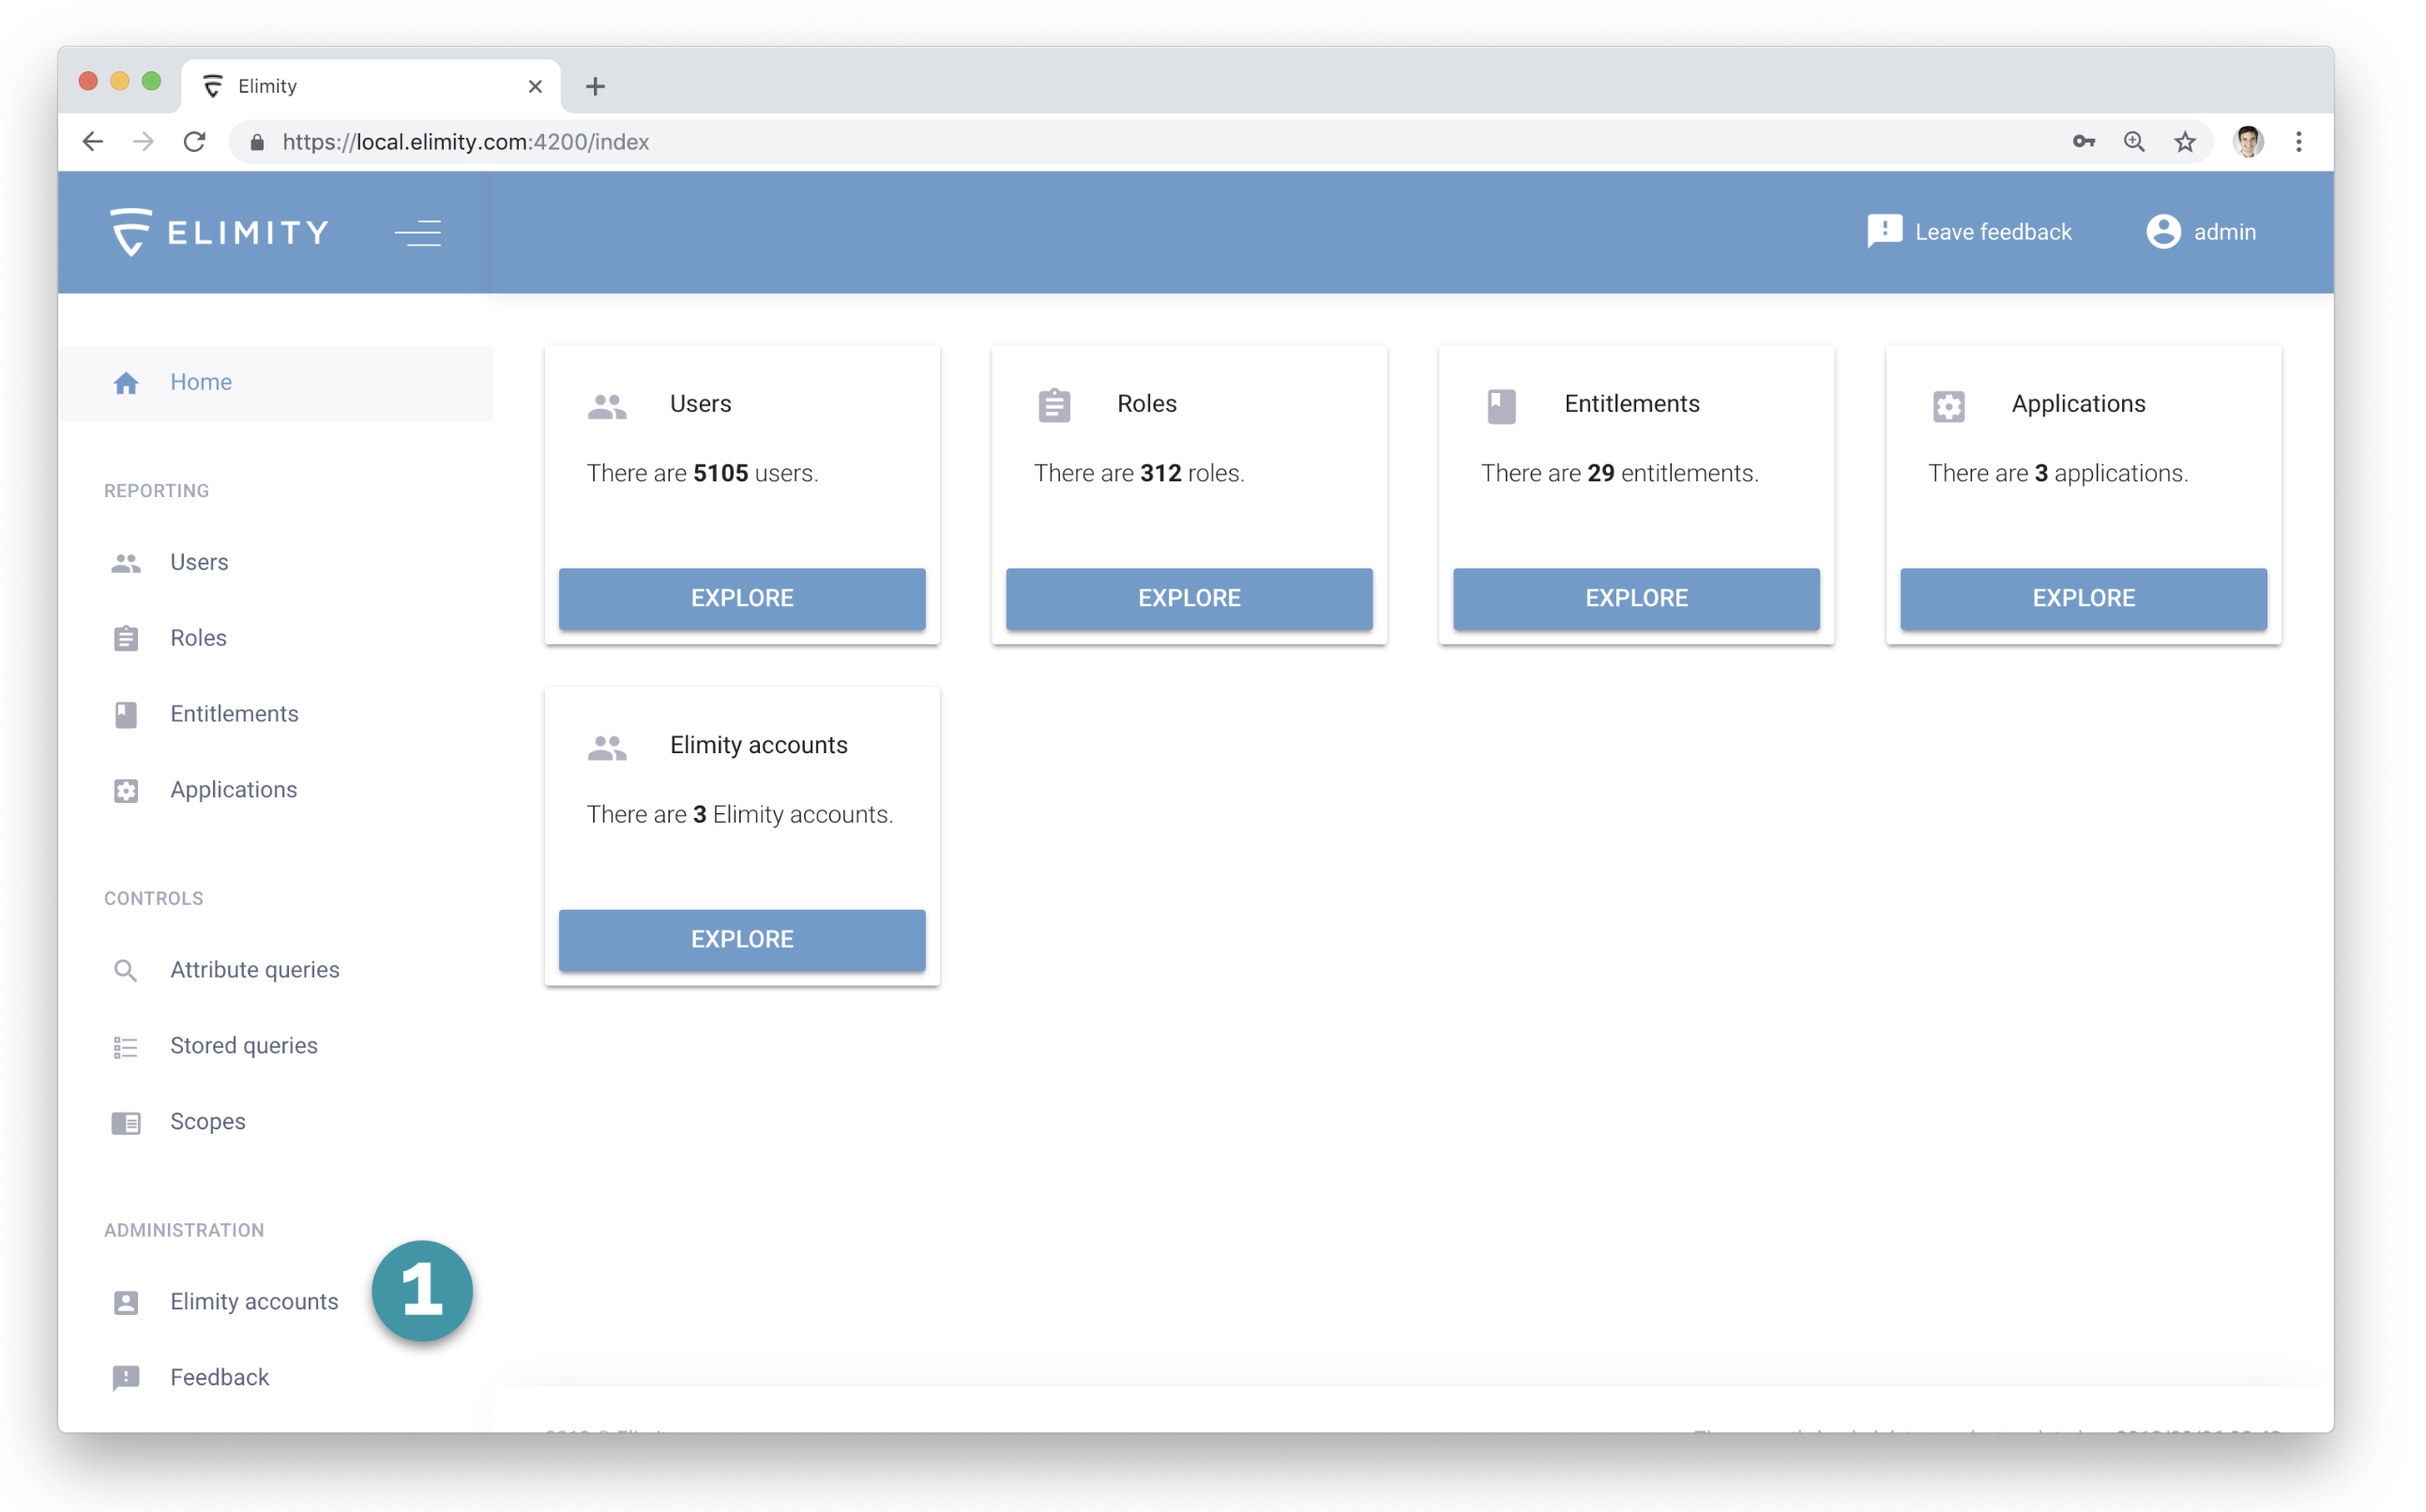
Image 1: The menu item for managing user accounts is highlighted as (1). This menu item is only shown to users with the appropriate permission.
Overview of the existing user accounts
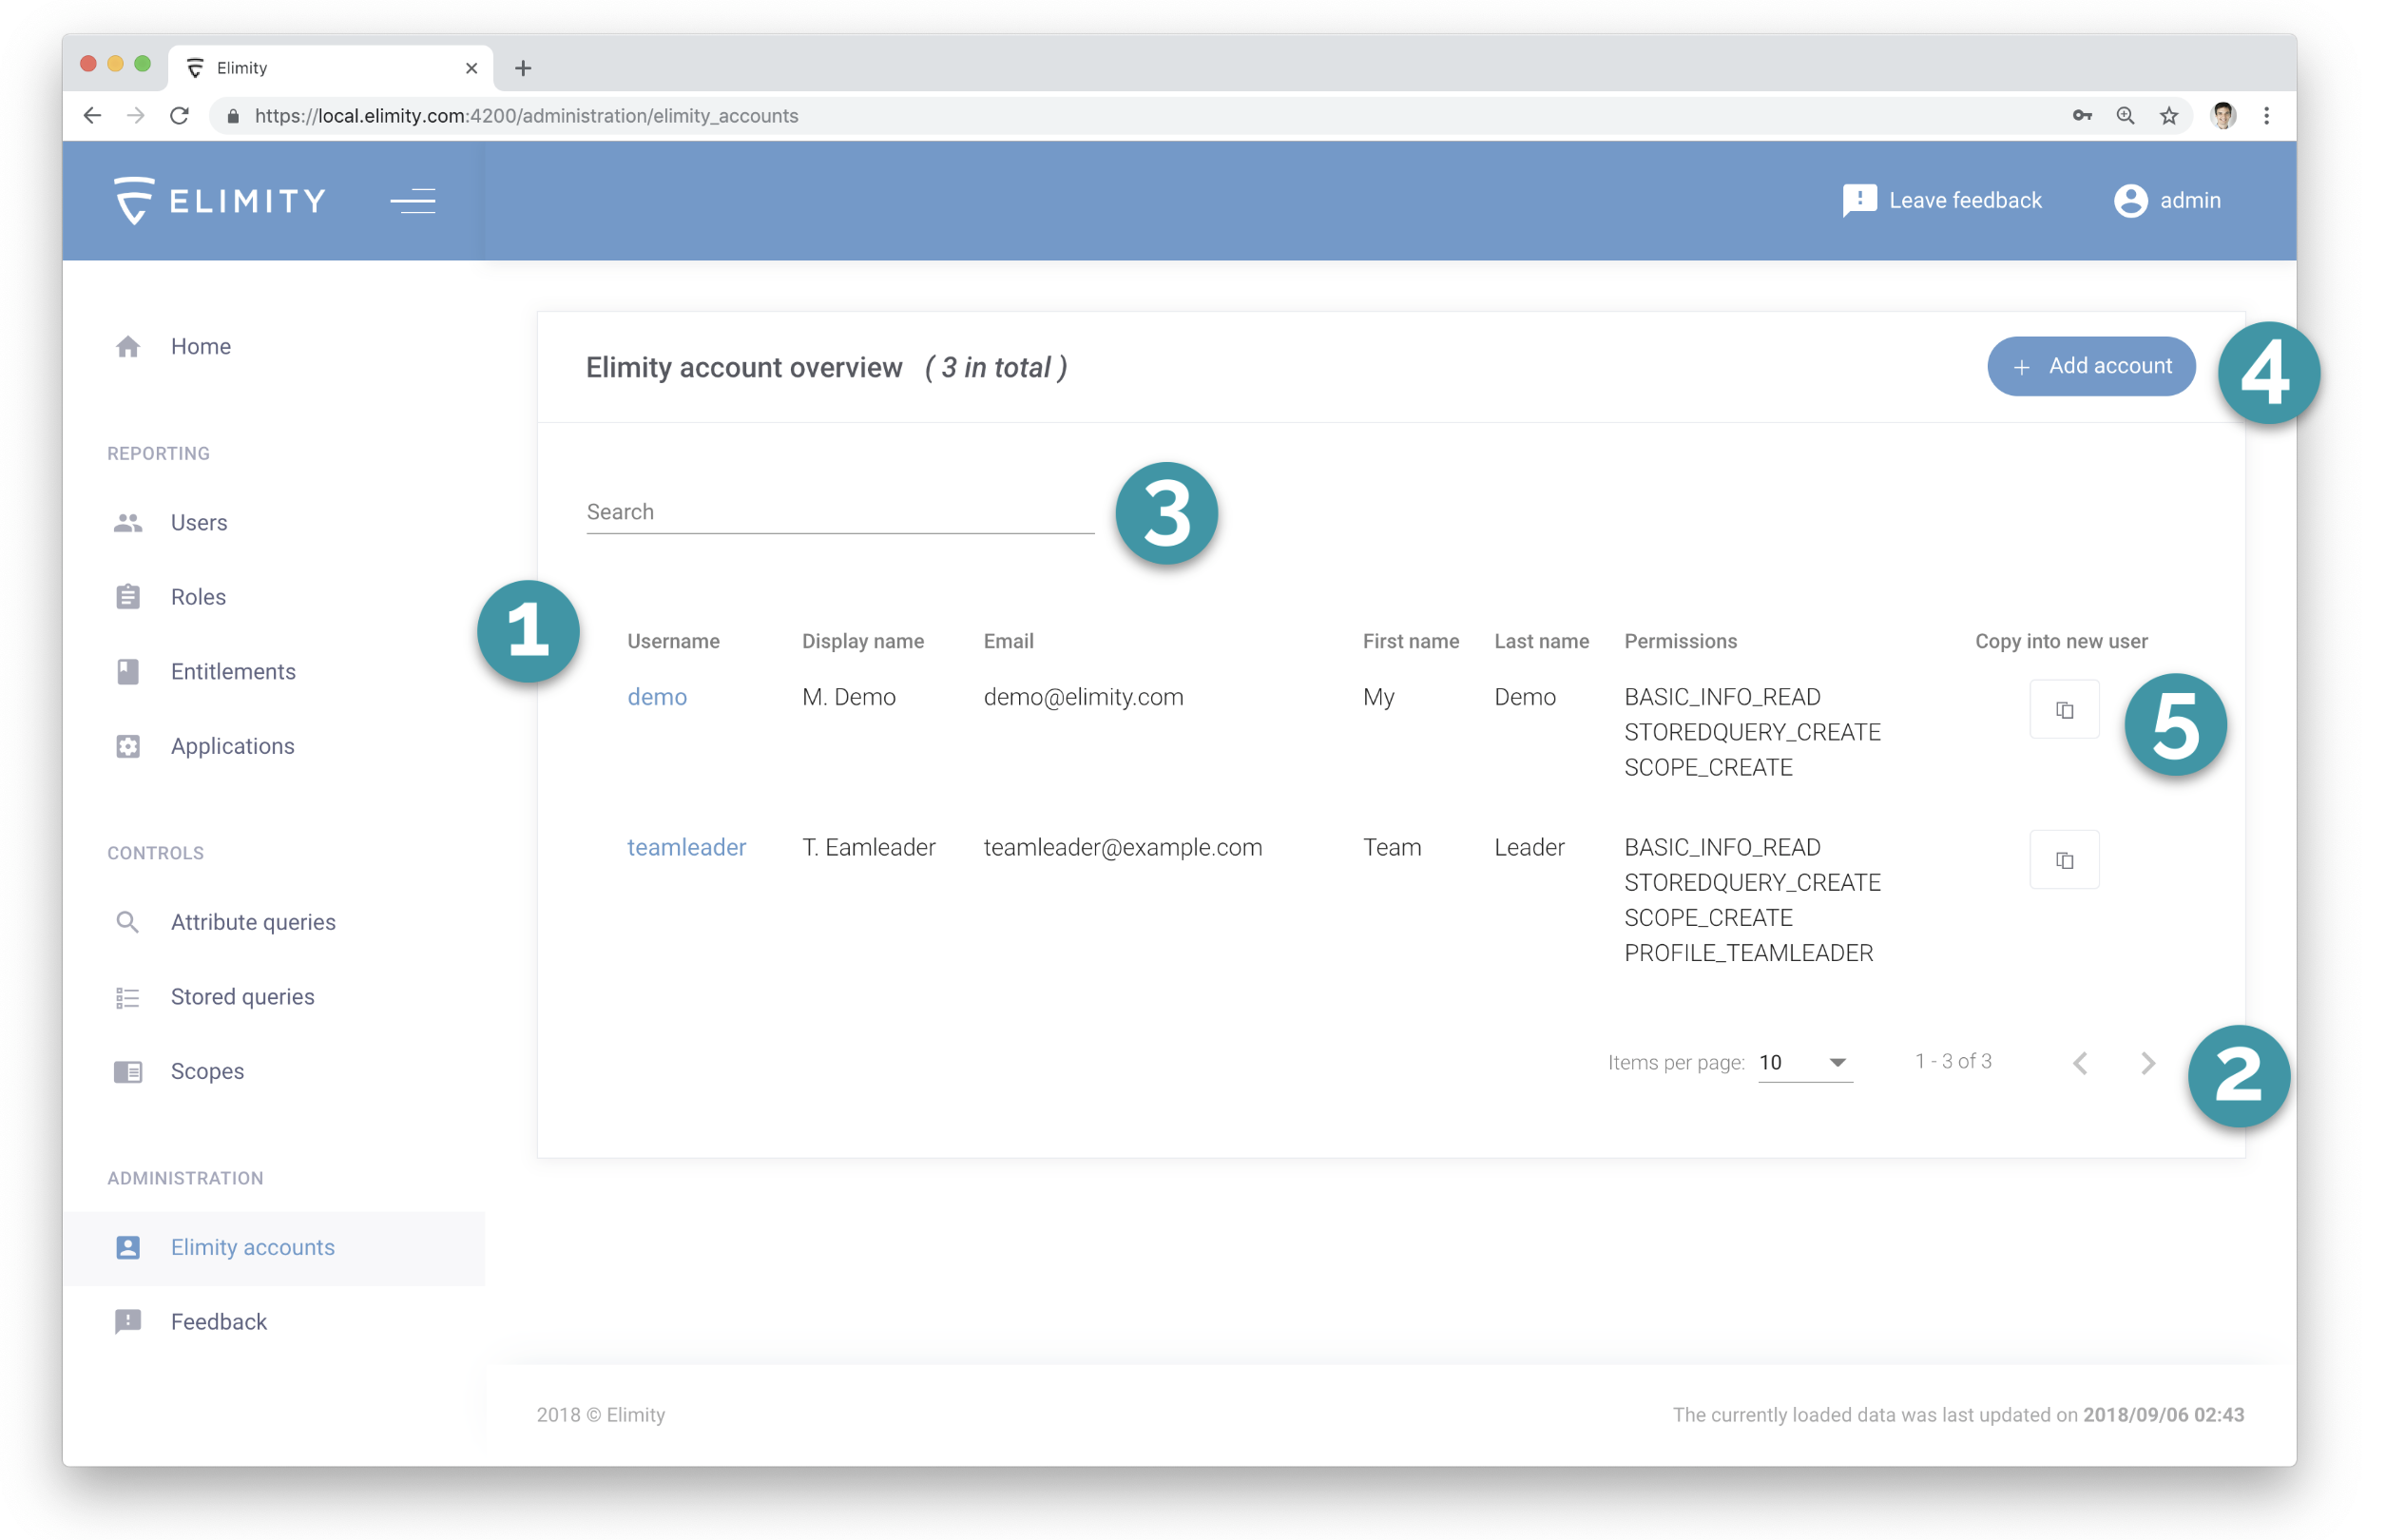
Image 2: The overview page of the provisioned user accounts.
The overview page of the existing user accounts is shown in Image 2:
(1) The main table listing the existing user accounts in pages of 10 accounts. For each user account, basic information is shown, together with the assigned permissions. Click the username to view or update the details of the user account.
(2) Use these buttons to navigate the main table: change the number of items shown per page or go to the next/previous page.
(3) Use this filter to filter the list of user accounts. The filter searches in the username, display name, mail, first name and last name in a case-insensitive manner.
(4) Use this button to add a user account.
(5) Use this button to create a new user account with the same permissions as the selected account.
Adding or updating a user account
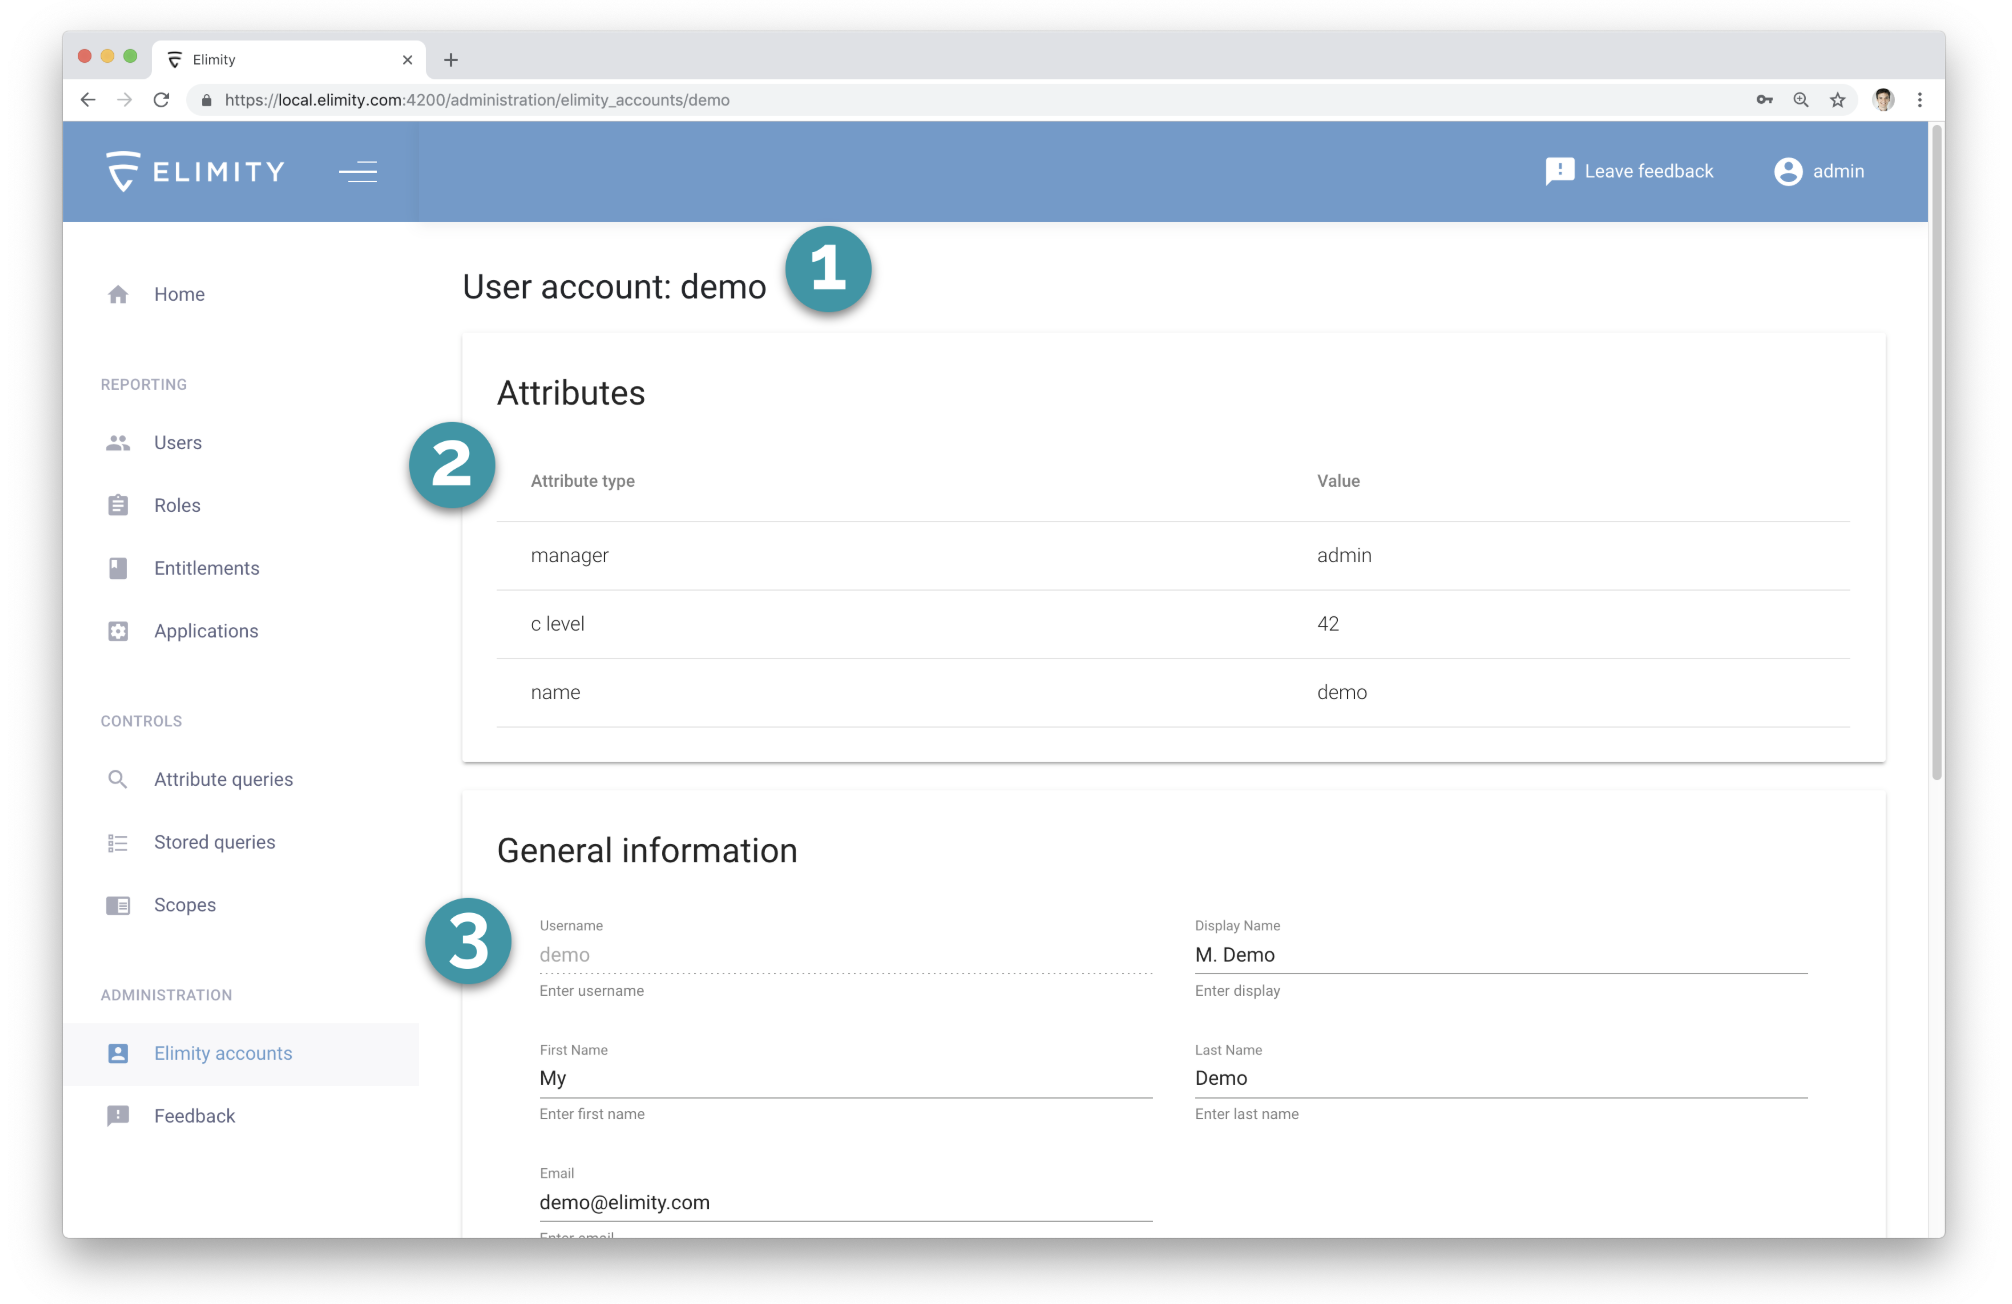
Image 3: The details page of a user account (part 1/2).
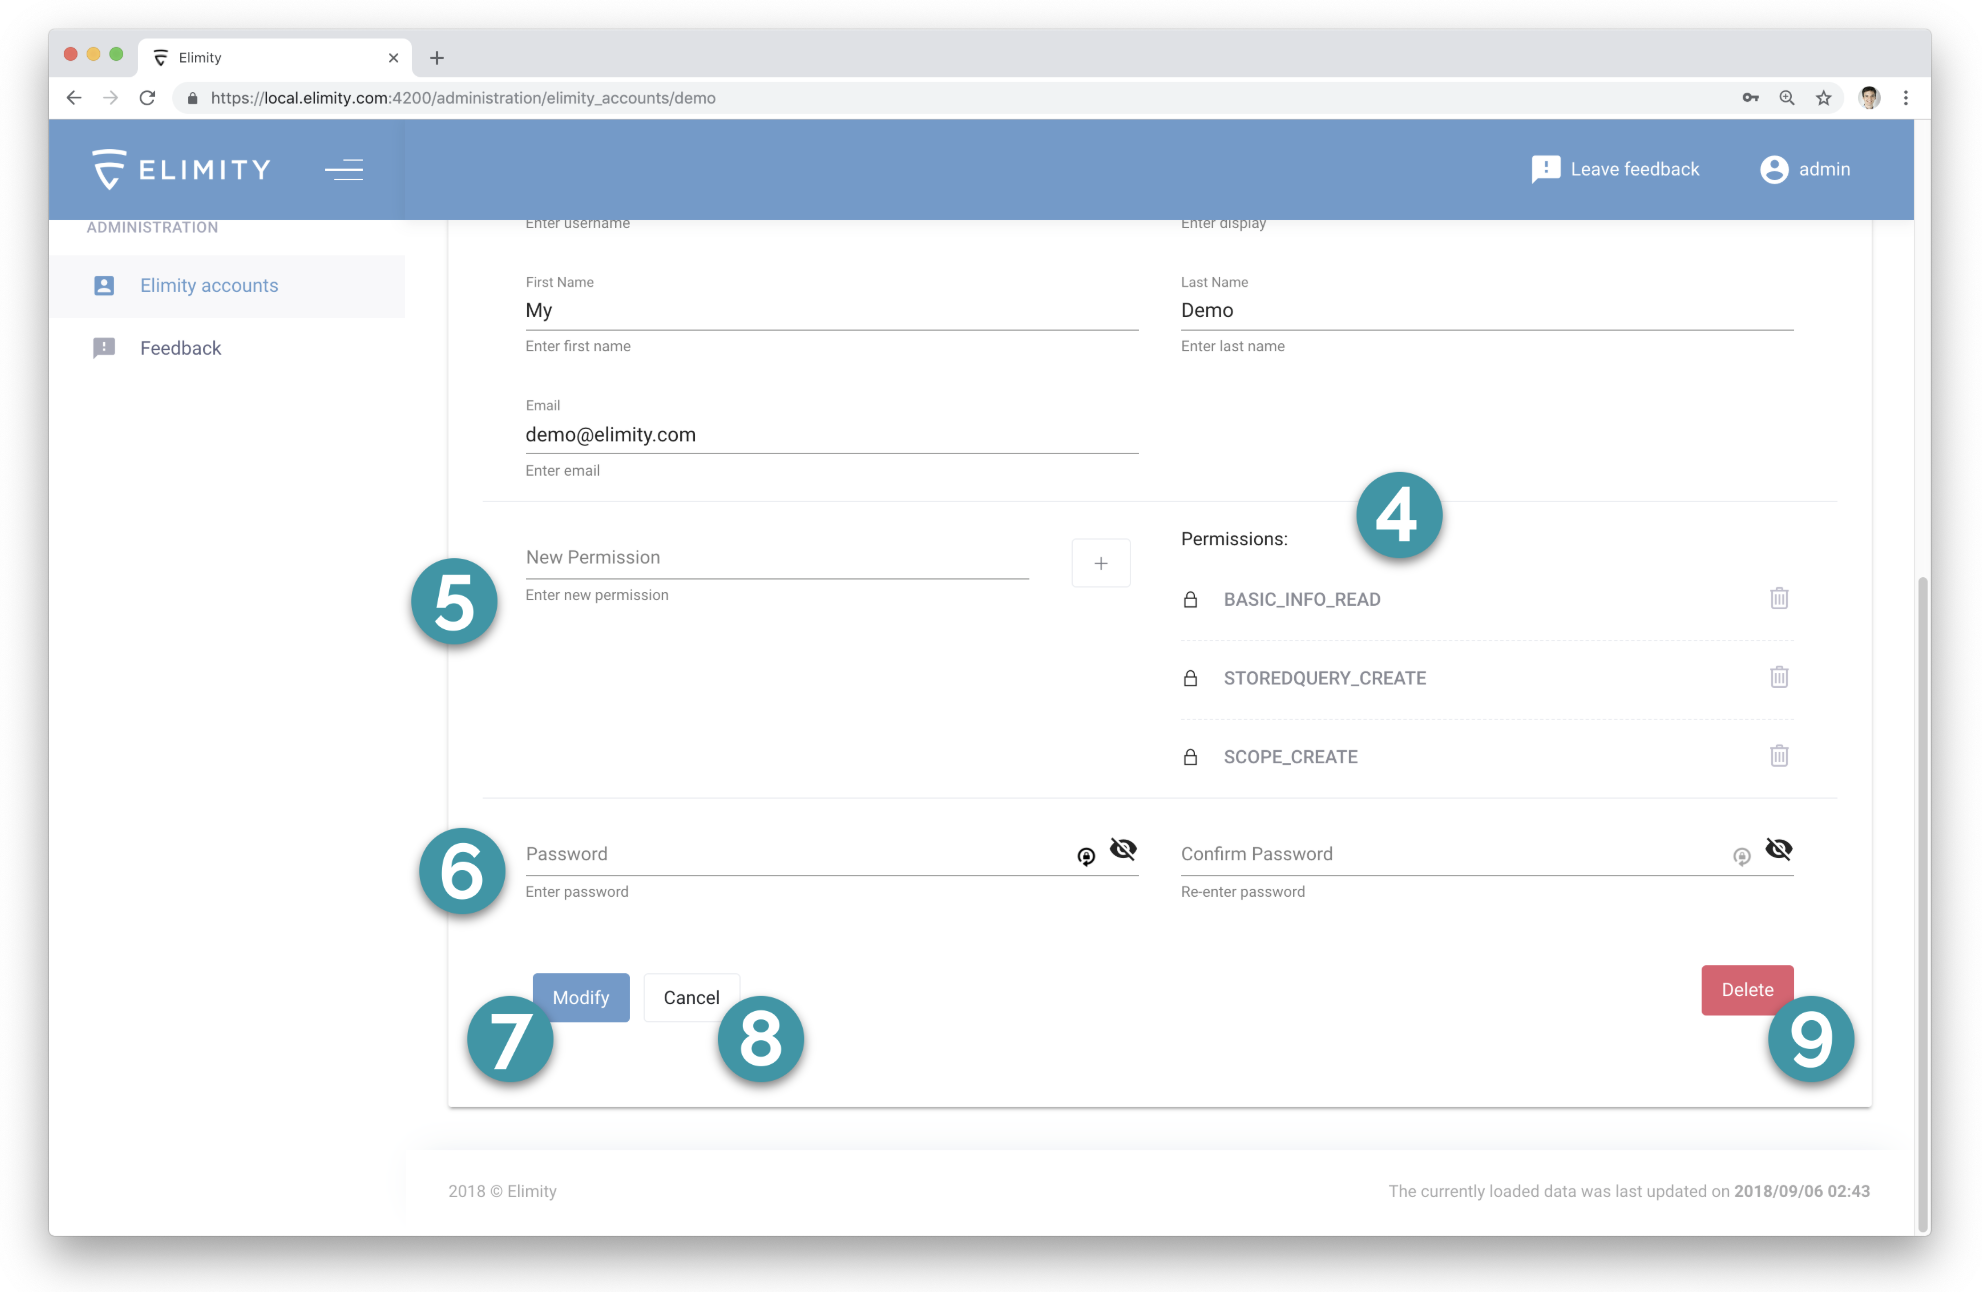
Image 4: The details page of a user account (part 2/2).
The details page of a user account is shown in Images 3 and 4 (when creating a new user, all fields will be empty):
(1) The user name of the user account for which the details are shown.
(2) The attributes assigned to this user account. These attributes are used for evaluating the custom access control profiles on requests of this user.
(3) General information of this user account: the username, display name, first name, last name and email address. Notice that all of these fields can be changed except for the username.
(4) The list of permissions currently assigned to this user account. Use the trash can icon to remove a permission from this user account.
(5) Use this form field to assign another permission to this user account. The permission has to be one of the existing permissions (one of the fixed permissions or a permission that represents one of the custom access control profiles).
(6) Use these fields to update the password for this user account.
(7) Click this button to apply all changes.
(8) Click this button to cancel all changes.
(9) Click this button to delete this user account. This action cannot be undone.
Method 2: Using the SCIM API
The third method for managing user accounts is creating, updating and deleting these using the SCIM API of Elimity Insights.
SCIM is a standardised protocol for managing user accounts over a REST API. Provisioning user accounts using the protocol is supported out of the box by more and more IAM tools (e.g., SailPoint and OneIdentity) and so does Elimity Insights.
For more information on SCIM, see this page.
API endpoints
The endpoints for the SCIM API are located at:
https://<your_url>/scim/v2/
To download the used SCIM schemas, use the following endpoints:
GET https://<your_url>/scim/v2/Schemas
GET https://<your_url>/scim/v2/Schemas/:resourceId
The full list of endpoints is as follows:
GET https://<your_url>/scim/v2/Users
POST https://<your_url>/scim/v2/Users
GET https://<your_url>/scim/v2/Users/:resourceId
DELETE https://<your_url>/scim/v2/Users/:resourceId
PUT https://<your_url>/scim/v2/Users/:resourceId

GET https://<your_url>/scim/v2/Groups
POST https://<your_url>/scim/v2/Groups
GET https://<your_url>/scim/v2/Groups/:resourceId
DELETE https://<your_url>/scim/v2/Groups/:resourceId
PUT https://<your_url>/scim/v2/Groups/:resourceId

GET https://<your_url>/scim/v2/Schemas
GET https://<your_url>/scim/v2/Schemas/:resourceId

GET https://<your_url>/scim/v2/ResourceTypes

GET https://<your_url>/scim/v2/ServiceProviderConfig
Authentication credentials for the SCIM API
The SCIM API is a REST API and authentication is performed using standard HTTP Basic Authentication.
The username and password are configured in the config file of Elimity Insights using the options ScimUser and ScimPassword.
Note: interaction with manual user management
An important note when working with SCIM provisioning is that Elimity Insights allows to use both manual provisioning as well as SCIM provisioning.
In other words, even when using SCIM provisioning an admin can still manually add, remove or update user accounts using method 1.
This can be very useful from time to time, but be aware that some SCIM provisioning tools will regularly perform a delta analysis between the existing accounts and the accounts as they should be according to the IAM administration. In that case, any manual changes will likely be overwritten or reverted by the SCIM provisioning tool.
Comments
0 comments
Please sign in to leave a comment.